
Turn on suggestions
Auto-suggest helps you quickly narrow down your search results by suggesting possible matches as you type.
Showing results for
Turn on suggestions
Auto-suggest helps you quickly narrow down your search results by suggesting possible matches as you type.
Showing results for
Community Tip - When posting, your subject should be specific and summarize your question. Here are some additional tips on asking a great question. X
Options
- Subscribe to RSS Feed
- Mark as New
- Mark as Read
- Bookmark
- Subscribe
- Printer Friendly Page
- Notify Moderator
How to use DataConnect when sending property values from the ThingWorx platform to ThingWorx Analytics.
No ratings
PLEASE NOTE DataConnect has now been deprecated and no longer in use and supported.
We are regularly asked in the community how to send data from ThingWorx platform to ThingWorx Analytics in order to perform some analytics computation.
There are different ways to achieve this and it will depend on the business needs.
- If the analytics need is about anomaly detection, the best way forward is to use ThingWatcher without the use of ThingWorx Analytics server. The ThingWatcher Help Center is an excellent place to start, and a quick start up program can be found in this blog.
- If the requirement is to perform a full blown analytics computation, then sending data to ThingWorx Analytics is required. This can be achieved by
- Using ThingWorx DataConnect, and this is what this blog will cover
- Using custom implementation. I will be very pleased to get your feedback on your experience in implementing custom solution as this could give some good ideas to others too.
In this blog we will use the example of a smart Tractor in ThingWorx where we collect data points on:
- Speed
- Distance covered since last tyre change
- Tyre pressure
- Amount of gum left on the tyre
- Tyre size.
From an Analytics perspective the gum left on the tyre would be the goal we want to analyse in order to know when the tyre needs changing.
We are going to cover the following:
Background
Workflow
DataConnect configuration
ThingWorx Configuration
Data Analysis Definition Configuration
Data Analysis Definition Execution
Demo files
For people not familiar with ThingWorx Analytics, it is important to know that ThingWorx Analytics only accepts a single datafile in a .csv format.
Each columns of the .csv file represents a feature that may have an impact on the goal to analyse.
For example, in the case of the tyre wear, the distance covered, the speed, the pressure and tyre size will be our features. The goal is also included as a column in this .csv file.
So any solution sending data to ThingWorx Analytics will need to prepare such a .csv file.
DataConnect will perform this activity, in addition to some transformation too.
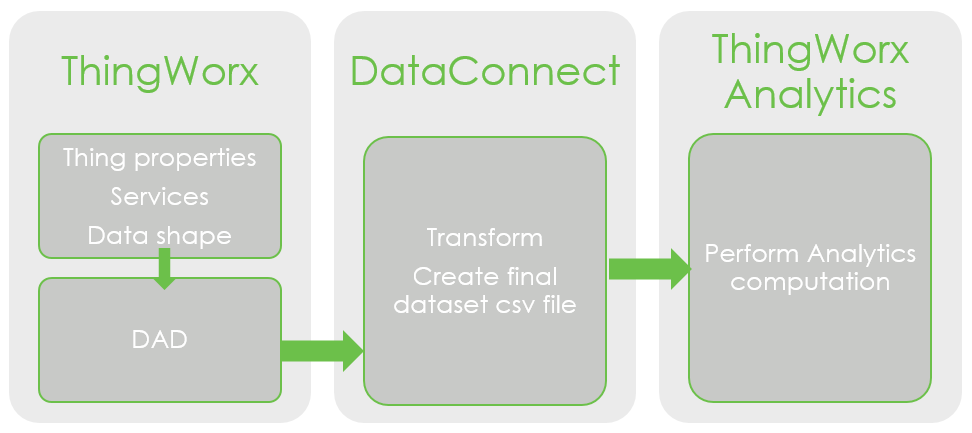
- Decide on the properties of the Thing to be collected, that are relevant to the analysis.
- Create service(s) that collect those properties.
- Define a Data Analysis Definition (DAD) object in ThingWorx.
The DAD uses a Data Shape to define each feature that is to be collected and sends them to ThingWorx Analytics. Part of the collection process requires the use of the services created in point 2. - Upon execution, the DAD will create one skinny csv file per feature and send those skinny .csv files to DataConnect. In the case of our example the DAD will create a speed.csv, distance.csv, pressure.csv, gumleft.csv, tyresize.csv and id.csv.
- DataConnect processes those skinny csv files to create a final single .csv file that contains all these features. During the processing, DataConnect will perform some transformation and synchronisation of the different skinny .csv files.
- The resulting dataset csv file is sent to ThingWorx Analytics Server where it can then be used as any other dataset file.
As seen in this workflow a ThingWorx server, DataConnect server and a ThingWorx Analytics server will need to be installed and configured.
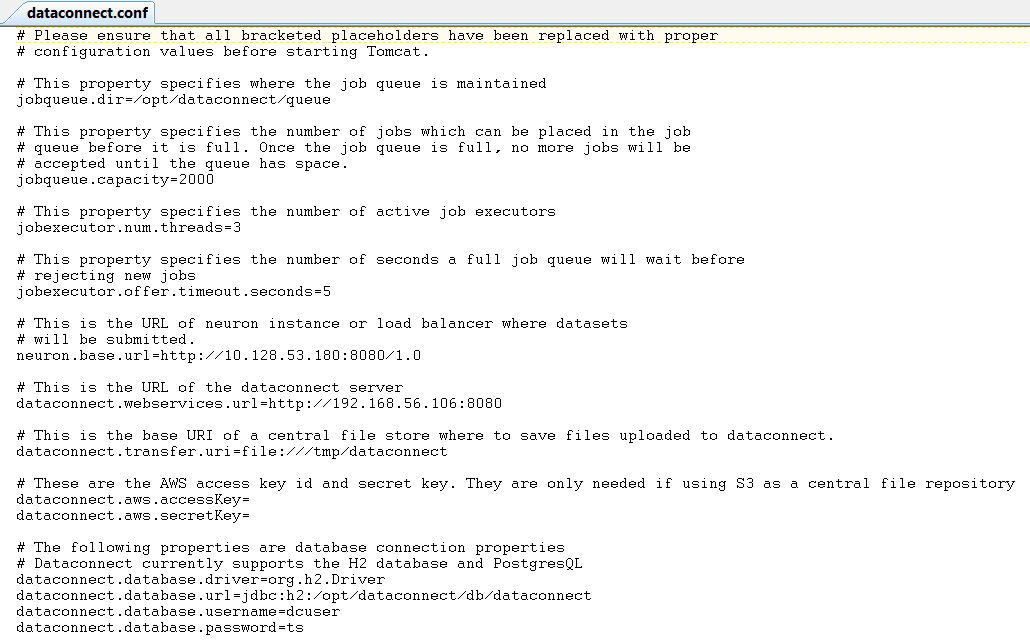
Thankfully, the installation of DataConnect is rather simple and well described in the ThingWorx DataConnect User’s guide.
Below I have provided a sample of a working dataconnect.conf file for reference, as this is one place where syntax can cause a problem:
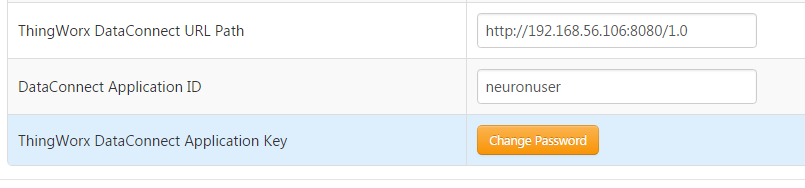
The platform Subsystem needs to be configured to point to the DataConnect server .
This is done under SYSTEM > Subsystems > PlatformSubsystem:
The most critical part of the process is to properly configure the DAD as this is what will dictate the format and values filled in the skinny csv files for the specific features.
The first step is to create a data shape with as many fields as feature(s)/properties collected.
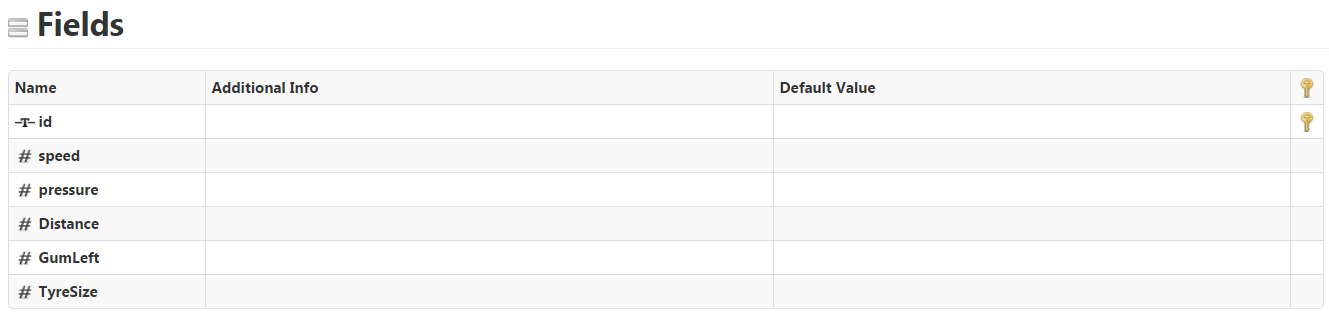
Note that one field must be defined as the primary key. This field is the one that uniquely identifies the Thing (more on this later).
We can then create the DAD using this data shape as shown below
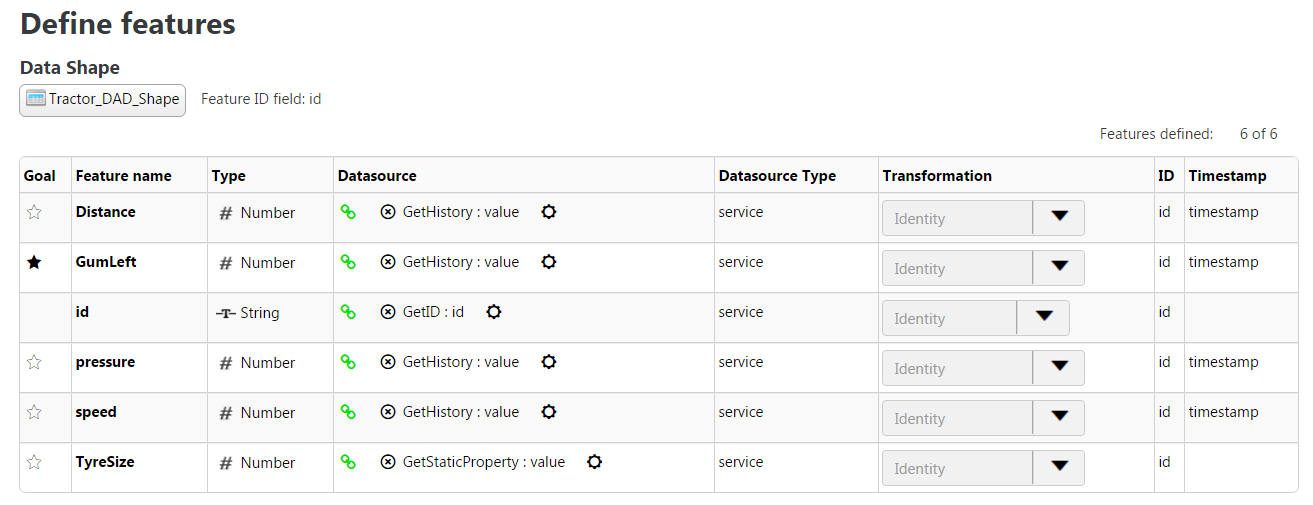
For each feature, a datasource needs to be defined to tell the DAD how to collect the values for the skinny csv files.
This is where custom services are usually needed. Indeed, the Out Of The Box (OOTB) services, such as QueryNumberPropertyHistory, help to collect logged values but the id returned by those services is continuously incremented. This does not work for the DAD.
The id returned by each services needs to be what uniquely identifies the Thing. It needs to be the same for all records for this Thing amongst the different skinny csv files. It is indeed this field that is then used by DataConnect to merge all the skinny files into one master dataset csv file.
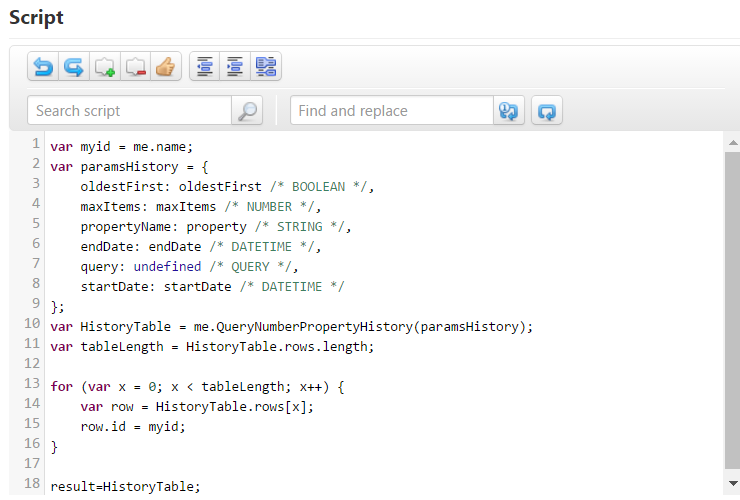
A custom service can make use of the OOTB services, however it will need to override the id value.
For example the below service uses QueryNumberPropertyHistory to retrieve the logged values and timestamp but then overrides the id with the Thing’s name.
The returned values of the service then needs to be mapped in the DAD to indicate which output corresponds to the actual property’s value, the Thing id and the timestamp (if needed).
This is done through the Edit Datasource window (by clicking on Add Datasource link or the Datasource itself if already defined in the Define Feature window).

On the left hand side, we define the origin of the datasource. Here we have selected the service GetHistory from the Thing Template smartTractor.
On the right hand side, we define the mapping between the service’s output and the skinny .csv file columns.
Circled in grey are the output from the service. Circled in green are what define the columns in the .csv file.
A skinny csv file will have 1 to 3 columns, as follow:
- One column for the ID. Simply tick the radio button corresponding to the service output that represents the ID
- One column representing the value of the Thing property. This is indicated by selecting the link icon on the left hand side in front of the returned data which represent the value (in our example the output data from the service is named value)
- One column representing the Timestamp. This is only needed when a property is time dependant (for example, time series dataset). On the example the property is Distance, the distance covered by the tyre does depend on the time, however we would not have a timestamp for the TyreSize property as the wheel size will remain the same.
How many columns should we have (and therefore how many output should our service has)?
- The .csv file representing the ID will have one column, and therefore the service collecting the ID returns only one output (Thing name in our smartTractor example – not shown here but is available in the download)
- Properties that are not time bound will have a csv file with 2 columns, one for the ID and one for the value of the property.
- Properties that are time bound will have 3 columns: 1 for the ID, one for the value and one for the timestamp. Therefore the service will have 3 outputs.
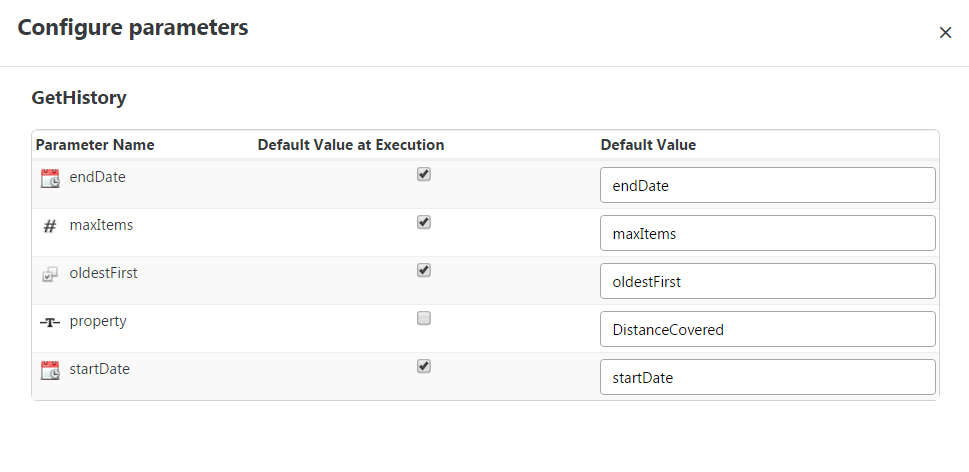
Additionally the input for the service may need to be configured, by clicking on the ![]() icon.
icon.
Once the datasources are configured, you should configure the Time Sampling Interval in the General Information tab.
This sampling interval will be used by DataConnect to synchronize all the skinny csv files. See the Help Center for a good explanation on this.
Once the above configuration is done, the DAD can be executed to collect properties’ value already logged on the ThingWorx platform.
Select Execution Settings in the DAD and enter the time range for property collection:

A dataset with the same name as the DAD is then created in DataConnect as well as in ThingWorx Analytics Server
Dataconnect:
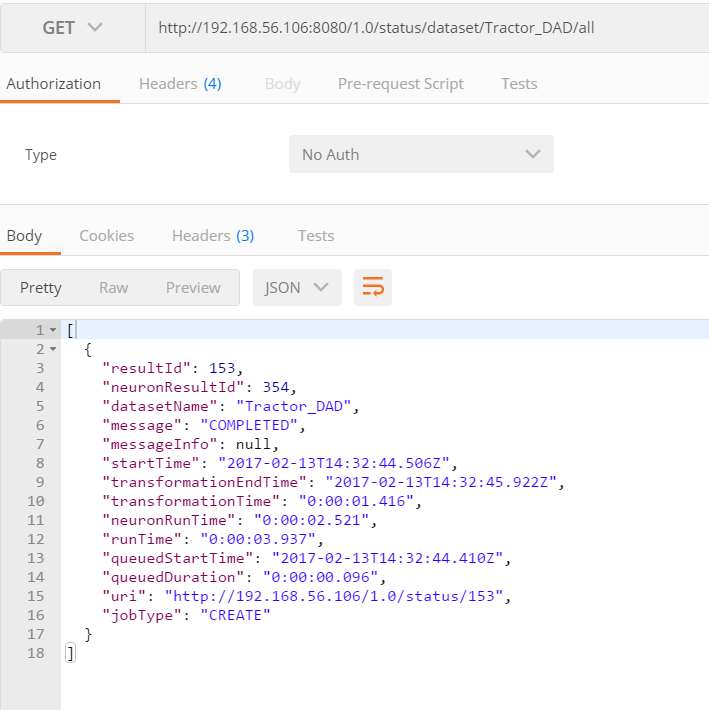
ThingWorx Analytics:
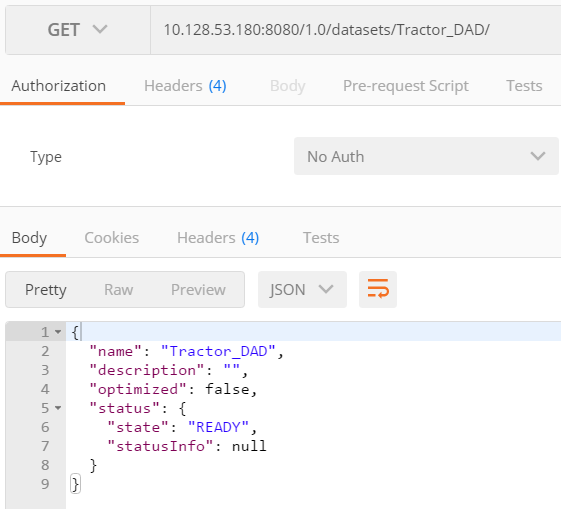
The dataset can then be processed as any other dataset inside ThingWorx Analytics.
For convenience I have also attached a ThingWorx entities export that can be imported into a ThingWorx platform for you to take a closer look at the setup discussed in this blog.
Attached is also a small simulator to populate the properties of the Tractor_1 Thing.
The usage is :
java -jar TWXTyreSimulatorClient.jar hostname_or_IP port AppKey
For example: java -jar TWXTyreSimulatorClient.jar 192.168.56.106 8080 d82510b7-5538-449c-af13-0bb60e01a129
Again feel free to share your experience in the comments below as they will be very interesting for all of us.
Thank you
